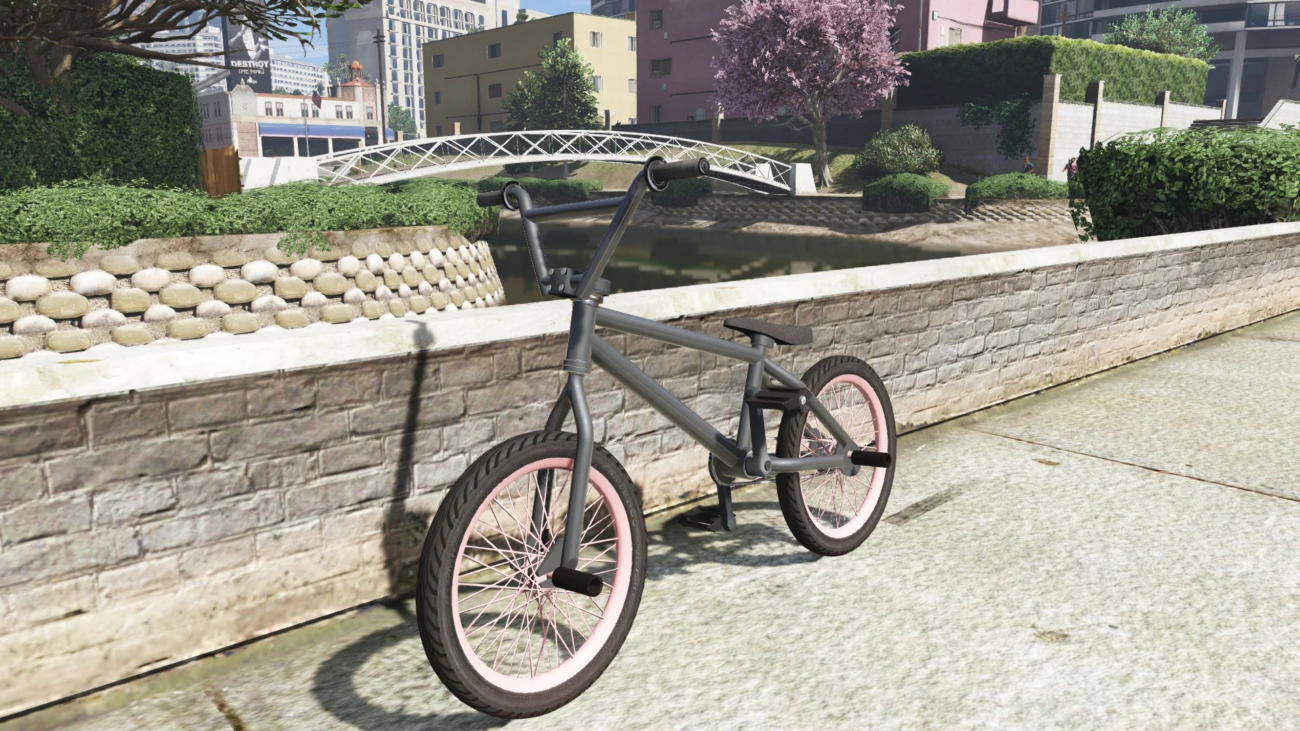
In GTA 5, the BMX bike isn’t just a simple ride—it’s a versatile, fun, and stylish way to cruise through Los Santos or pull off crazy stunts. While BMX bikes are primarily known for their agility and ability to perform tricks, many players want to know if you can customize a BMX in GTA 5 to match your style.
The good news: BMX bikes in GTA 5 are highly customizable in terms of performance and appearance, especially if you use the Los Santos Customs garage. You can apply different paint jobs, colors, and liveries, giving your BMX a unique look that stands out in multiplayer sessions or free roam. Options include bright neon colors, matte finishes, and even custom decal designs to show off your personal flair.
Beyond aesthetics, players can also tweak the BMX’s handling and suspension using mods (on PC) to enhance tricks, jumps, and flips. While the base BMX is already lightweight and perfect for stunts, adjusting brake response and tire grip through in-game upgrades or mods can make a huge difference during races or parkour-style challenges.
For serious stunt enthusiasts, customizing your BMX isn’t just about looks—it’s about performance optimization. A well-modified BMX can make grinding rails, jumping ramps, or escaping police chases smoother and more fun. Combined with GTA Online’s social features, a custom BMX can be a statement piece among friends, showcasing both style and skill.
Whether you’re performing epic tricks, racing through alleyways, or simply cruising the streets of Los Santos, a custom BMX bike in GTA 5 lets you ride in style and maximize fun. So, get creative, explore the customization options, and turn your BMX into a one-of-a-kind machine that reflects your personality.
A mini bike is the perfect blend of simplicity, excitement, and accessibility, making it a top choice for riders of all ages who want instant fun without complication. Known for its compact frame, low seat height, and easy handling, a mini bike is ideal for beginners, casual riders, and anyone looking for a thrilling ride in a small package.
Designed with ease of use in mind, mini bikes typically feature automatic or centrifugal clutch systems, eliminating the need for manual gear shifting. This makes them especially popular as starter bikes for kids and teens, as well as adults who want a no-stress riding experience. Just twist the throttle and go—no learning curve, no intimidation.
Mini bikes are powered by reliable small-displacement engines, often ranging from 40cc to 200cc. Despite their size, these engines deliver impressive torque, making mini bikes perfect for trail riding, backyard tracks, camping trips, and recreational off-road adventures. Their lightweight construction allows for excellent maneuverability, while rugged tires provide dependable traction on dirt, grass, and gravel.
From a maintenance perspective, mini bikes shine. With simple mechanical components, they are easy to maintain, cost-effective to repair, and perfect for DIY enthusiasts. This affordability makes mini bikes a smart investment for families or riders who want dependable fun without high ownership costs.
For online shoppers, mini bikes are highly searchable thanks to popular keywords like “mini bike for sale,” “kids mini bike,” “small off-road bike,” and “beginner dirt bike alternative.” Their versatility and budget-friendly pricing make them a strong conversion driver in the powersports market.
Whether you’re buying a first bike for a young rider, adding a fun machine to your collection, or looking for a compact off-road solution, a mini bike delivers pure riding enjoyment in a lightweight, easy-to-ride format. Small in size but big on excitement, it’s the ultimate gateway to off-road adventure.
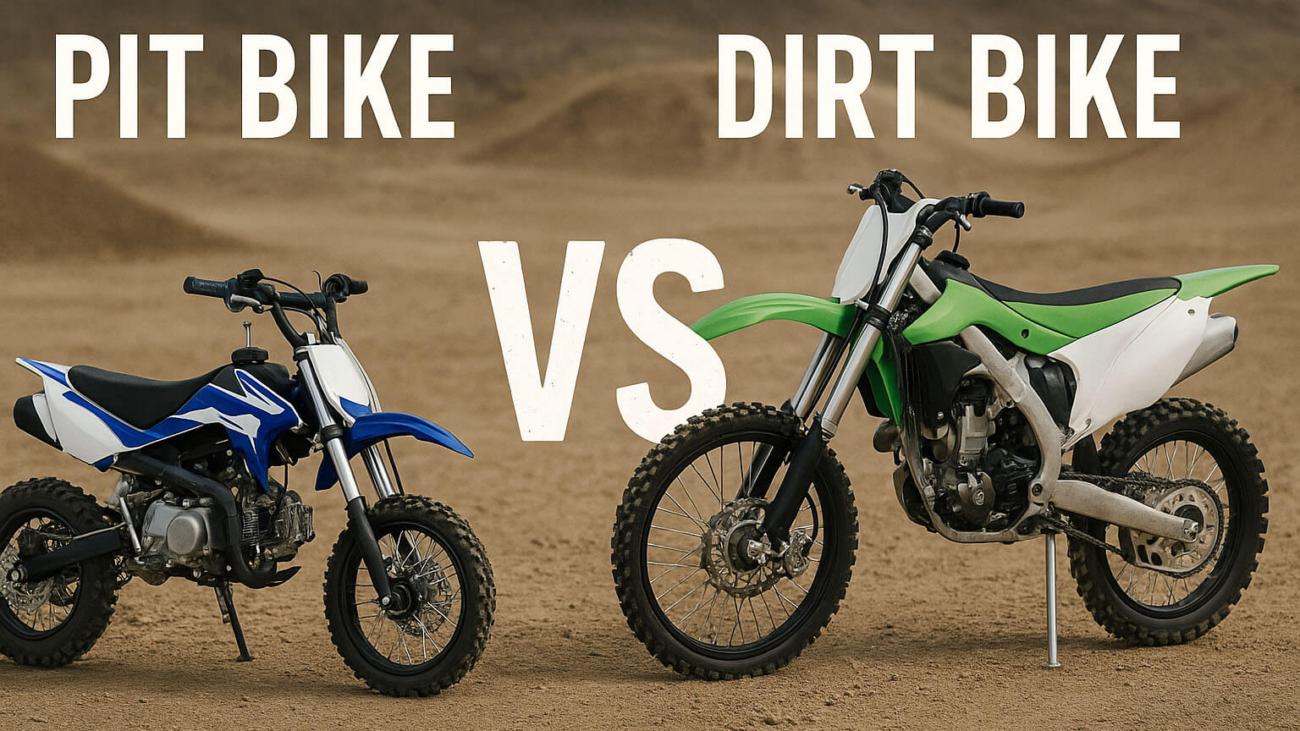
Pit Bike: Performance-Driven Off-Road Precision
A pit bike is built for riders who crave control, performance, and authentic dirt bike styling in a smaller, more manageable form. Originally designed for navigating motocross pits, pit bikes have evolved into high-performance machines favored by youth riders, beginners, and experienced off-road enthusiasts alike.
Unlike mini bikes, pit bikes typically feature manual transmissions and clutch systems, allowing riders to develop real riding skills that translate directly to full-size dirt bikes. This makes pit bikes an excellent choice for those serious about improving technique, balance, and throttle control. With engine sizes commonly ranging from 90cc to 160cc, pit bikes deliver responsive power while maintaining excellent control.
Built with durable suspension systems, reinforced frames, and knobby off-road tires, pit bikes excel on dirt tracks, trails, and practice circuits. Their motocross-inspired design includes front and rear suspension, giving riders confidence when tackling bumps, jumps, and uneven terrain. This performance-oriented construction sets pit bikes apart as a true training and recreation machine.
Pit bikes are also known for their sporty appearance, mirroring full-size dirt bikes with aggressive bodywork, race-style graphics, and professional ergonomics. This visual appeal plays a major role in purchasing decisions, especially for younger riders who want a bike that looks as serious as it rides.
From an SEO standpoint, pit bikes rank strongly for keywords like “pit bike for beginners,” “youth pit bike,” “small dirt bike,” “training dirt bike,” and “off-road pit bike.” These high-intent search terms attract buyers who are ready to upgrade their riding experience, making pit bikes a powerful product for conversion-focused online stores.
If you’re looking for a machine that bridges the gap between casual riding and competitive motocross, a pit bike is the perfect choice. Compact yet capable, it delivers authentic dirt bike performance in a smaller, confidence-boosting package—ideal for riders who want to grow their skills and dominate the dirt.
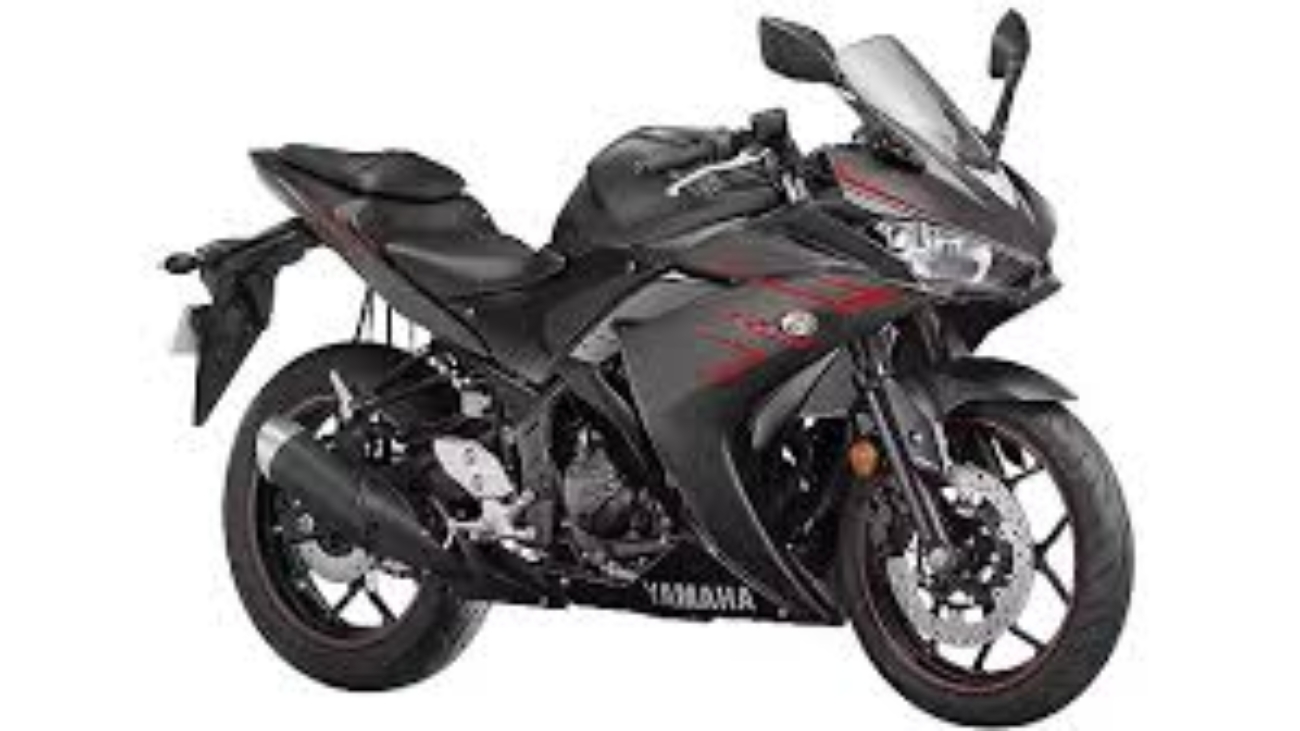
Curious how fast the Yamaha YZF-R3 can go in first gear? You’re not alone. Riders love the R3 for its smooth power delivery, beginner-friendly design, and sporty performance — and understanding first-gear speed is key to mastering its ride dynamics. On a stock Yamaha R3, first gear typically tops out at around 30 mph (≈ 48 km/h) under normal riding conditions. This makes it perfect for quick launches, tight turns, and low-speed control while still offering enough punch for spirited takeoffs.
The R3’s 6-speed transmission includes a short, responsive first gear geared for strong low-end torque. This allows new riders to feel confident pulling away from a stop while giving experienced riders a satisfying burst of acceleration. In everyday riding, most people shift into second gear earlier — often between 12–20 mph — depending on comfort, traffic flow, and how aggressively they’re accelerating. But if you keep the revs high, first gear can stretch close to that 30-mph mark before you need to shift.
First gear is where the R3 truly shines in city environments. It offers excellent throttle control for maneuvering through traffic, parking lots, and tight urban corners. Its predictable power curve ensures smooth engagement, making it ideal for low-speed drills and precision riding. While you won’t hit highway speeds in first gear, it provides the foundation for the R3’s quick, punchy acceleration and helps set the tone for the bike’s sporty feel.
As you climb into higher gears, the R3’s 321cc twin-cylinder engine really comes alive — but it all starts with that responsive, confidence-boosting first gear. In short, expect up to about 30 mph in first gear, combined with sharp control, smooth power delivery, and the kind of rider-friendly performance that makes the Yamaha R3 a favorite worldwide.
Yamaha R3 — How Fast Does It Go in First Gear? Full Breakdown for Riders
Curious how fast the Yamaha YZF-R3 can go in first gear? You’re not alone. Riders love the R3 for its smooth power delivery, beginner-friendly design, and sporty performance — and understanding first-gear speed is key to mastering its ride dynamics. On a stock Yamaha R3, first gear typically tops out at around 30 mph (≈ 48 km/h) under normal riding conditions. This makes it perfect for quick launches, tight turns, and low-speed control while still offering enough punch for spirited takeoffs.
The R3’s 6-speed transmission includes a short, responsive first gear geared for strong low-end torque. This allows new riders to feel confident pulling away from a stop while giving experienced riders a satisfying burst of acceleration. In everyday riding, most people shift into second gear earlier — often between 12–20 mph — depending on comfort, traffic flow, and how aggressively they’re accelerating. But if you keep the revs high, first gear can stretch close to that 30-mph mark before you need to shift.
First gear is where the R3 truly shines in city environments. It offers excellent throttle control for maneuvering through traffic, parking lots, and tight urban corners. Its predictable power curve ensures smooth engagement, making it ideal for low-speed drills and precision riding. While you won’t hit highway speeds in first gear, it provides the foundation for the R3’s quick, punchy acceleration and helps set the tone for the bike’s sporty feel.
As you climb into higher gears, the R3’s 321cc twin-cylinder engine really comes alive — but it all starts with that responsive, confidence-boosting first gear. In short, expect up to about 30 mph in first gear, combined with sharp control, smooth power delivery, and the kind of rider-friendly performance that makes the Yamaha R3 a favorite worldwide.
If you’re in Indianapolis and searching for the perfect ride that combines style, power, and affordability, you’re in luck. Used custom mini bikes offer an unbeatable blend of performance and personality, and now is the perfect time to find one that suits your riding style. Whether you’re a seasoned rider looking to expand your collection or a beginner eager to hit the streets with something unique, these mini bikes are designed to turn heads and deliver endless fun.
At Ride Custom Bikes, we specialize in high-quality, pre-loved custom mini bikes that have been carefully inspected and maintained to ensure optimal performance. Each bike has its own story and charm, reflecting the passion and craftsmanship of its previous owner. From sleek racing-inspired designs to rugged off-road models, our inventory in Indianapolis features a variety of options to match your style and riding needs.
Why Choose a Used Custom Mini Bike?
Opting for a used custom mini bike in Indianapolis is not just about affordability; it’s about value and individuality. These bikes offer:
Unique Designs: Stand out with a bike that reflects your personality. Our used mini bikes come in a wide range of custom colors, graphics, and modifications.
Proven Performance: Each bike has been tested to guarantee reliability, so you can enjoy a smooth and exciting ride without the wait or the cost of a brand-new model.
Eco-Friendly Option: Purchasing used is a sustainable choice, reducing waste while giving a pre-loved bike a new lease on life.
Ride in Style and Confidence
Whether you’re cruising around your neighborhood, tackling a local trail, or adding to your collection, our used custom mini bikes offer unmatched excitement and style. Indianapolis riders love the versatility, maneuverability, and thrill that comes with these compact machines. And with our easy online browsing and buying experience at Ride Custom Bikes, securing your next mini bike has never been simpler.
Don’t settle for ordinary when you can own a custom mini bike that’s as unique as you are. Explore our selection today, experience the adrenaline, and join a community of riders who value quality, fun, and individuality. Your next adventure awaits, and it starts with a ride that truly stands out.
Visit Ride Custom Bikes now to find your perfect used custom mini bike in Indianapolis!
Kawasaki Z900 vs Ninja 1000SX – Which Is Best for Custom Builds in the USA?
When it comes to customizing performance street bikes, two Kawasaki legends stand out: the Z900 and the Ninja 1000SX.
Both deliver thrilling power, stunning design, and near-endless potential for upgrades — but depending on your goals, one may fit your custom build vision better than the other.
In this in-depth guide, we’ll compare the Kawasaki Z900 vs Ninja 1000SX, focusing on performance, comfort, customization potential, and overall value for riders in the USA.
Both bikes share Kawasaki’s legendary inline-four DNA, but their tuning and character are distinct.
Kawasaki Z900
Engine: 948cc inline-four
Power: 125 HP @ 9,500 rpm
Torque: 98.6 Nm @ 7,700 rpm
Character: Raw, responsive, and designed for pure street aggression
The Z900’s power delivery is immediate and punchy, perfect for urban riding or weekend canyon blasts. Its lightweight chassis and naked design give riders a visceral, unfiltered experience.
Kawasaki Ninja 1000SX
Engine: 1043cc inline-four
Power: 140 HP @ 10,000 rpm
Torque: 111 Nm @ 8,000 rpm
Character: Smooth, refined, and built for long-distance sport touring
The Ninja 1000SX delivers effortless acceleration with a broader torque curve, making it more versatile for high-speed touring and everyday commuting alike.
✅ Verdict: If you want raw streetfighter power and agility, the Z900 wins. If you prefer a refined powerhouse with all-day comfort, go Ninja 1000SX.
🧩 Customization Potential
Both motorcycles are fantastic platforms for custom builds, but their modification styles differ.
Z900 Customization Focus
The Z900’s naked styling makes it ideal for aesthetic and performance mods.
Exhaust Upgrades: SC Project, Akrapovič, or Yoshimura slip-ons.
Handlebar Conversions: Fat bars or clip-ons for a streetfighter look.
Bodywork: Carbon fiber tank covers, belly pans, and tail tidies.
ECU Tuning: Boost throttle response and eliminate factory restrictions.
You can easily transform the Z900 into a track-ready streetfighter or aggressive urban machine.
Ninja 1000SX Customization Focus
This bike appeals to touring and sport-tuning enthusiasts.
Luggage Systems: Givi or SW-Motech panniers for touring builds.
Windscreen & Aerodynamics: Taller screens and winglets for wind management.
Suspension Upgrades: Öhlins or Nitron setups for stability on long rides.
Electronics: Add GPS, heated grips, and custom lighting systems.
The Ninja 1000SX shines as a high-performance touring bike that blends speed and comfort effortlessly.
✅ Verdict:
Z900: Best for aesthetic and performance-driven builds.
Ninja 1000SX: Best for tech-enhanced touring builds.
🏍️ Handling and Ride Dynamics
Z900
Weight: 468 lbs (wet)
Suspension: Adjustable front and rear (basic tuning range)
Ride Feel: Agile, light, and playful — excels in urban and twisty roads.
Ninja 1000SX
Weight: 514 lbs (wet)
Suspension: Fully adjustable fork and shock
Ride Feel: More planted, stable, and confidence-inspiring at high speeds.
The Z900 feels more flickable and nimble, while the Ninja 1000SX offers superior stability and long-distance composure.
✅ Verdict: If your rides are short and spirited, go for the Z900. If you love long-distance performance and touring, choose the Ninja 1000SX.
🧠 Electronics and Rider Aids
Z900
Ride modes: 4 (Sport, Road, Rain, Rider)
Traction control: 3 levels
TFT display and Bluetooth connectivity
Ninja 1000SX
Ride modes: 4 with power modes
Cornering ABS and traction control
Cruise control and quickshifter (standard)
TFT display with Kawasaki Rideology app integration
The Ninja 1000SX packs more advanced electronics, especially useful for touring riders.
✅ Verdict: For tech and convenience: Ninja 1000SX For simplicity and raw control: Z900
🧱 Ergonomics and Comfort
Z900
Upright, aggressive seating
Narrow seat, better for short rides or commuting
Minimal wind protection
Ninja 1000SX
Slightly forward-leaning sport-touring position
Plush seat and adjustable windscreen
Excellent long-distance comfort
✅ Verdict: Commuters and urban riders will prefer the Z900’s upright stance, while long-distance riders will appreciate the Ninja 1000SX’s comfort-focused ergonomics.
🔧 Aftermarket Support and Custom Parts Availability
The Z900 enjoys a massive aftermarket following thanks to its popularity among streetfighter builders. You’ll find hundreds of parts for:
Exhaust systems
Frame sliders
Body kits
LED conversions
Meanwhile, the Ninja 1000SX benefits from a strong touring accessories ecosystem — panniers, windscreens, and electronic add-ons are plentiful.
✅ Verdict:
Z900: Easier and cheaper to modify.
Ninja 1000SX: More specialized upgrades available for touring.
💰 Cost of Customization
Modification Type
Z900 (USD)
Ninja 1000SX (USD)
Exhaust System
$700 – $1,500
$900 – $1,800
ECU Flash & Tune
$400 – $900
$600 – $1,200
Suspension Upgrades
$800 – $1,500
$1,200 – $2,500
Bodywork & Lighting
$400 – $1,000
$600 – $1,200
Touring Accessories
$300 – $800
$800 – $2,000
Total Estimate
$2,600 – $6,700
$4,000 – $8,700
✅ Verdict: If budget-friendly customization is your priority, the Z900 delivers the best bang for the buck.
🇺🇸 Which Bike Is Better for Custom Builds in the USA?
Category
Winner
Raw Power
Ninja 1000SX
Agility
Z900
Touring Comfort
Ninja 1000SX
Budget Customization
Z900
Tech Features
Ninja 1000SX
Aesthetic Mods
Z900
Final Verdict:
Choose the Kawasaki Z900 if you want a lightweight, aggressive platform for street and performance builds.
Choose the Kawasaki Ninja 1000SX if you value refinement, comfort, and long-distance touring capability.
Ninja ZX-10R – Track-ready superbike for elite builders.
🏁 Conclusion: Two Legends, Two Custom Paths
The Kawasaki Z900 and Ninja 1000SX both represent engineering excellence—but they cater to different kinds of riders and builders.
If your dream bike is an agile, aggressive, street-dominating naked machine, the Z900 is your blank canvas. If you’re chasing sport-touring luxury with customization potential, the Ninja 1000SX is the smarter choice.
Either way, both deliver exceptional performance and personalization potential — making them top contenders for your next custom Kawasaki build in the USA.
Custom Kawasaki KLX250 Off-Road Setup – The Ultimate Trail and Enduro Build
The Kawasaki KLX250 has earned its reputation as one of the most versatile dual-sport motorcycles on the market. Lightweight, reliable, and affordable, it’s a favorite among riders who enjoy tackling both paved roads and rugged off-road trails.
But with the right custom Kawasaki KLX250 off-road setup, you can take its performance to the next level—transforming it into a purpose-built enduro machine ready for anything from forest trails to desert dunes.
With a thoughtful custom Kawasaki KLX250 off-road setup, you can elevate this lightweight dual-sport into a serious trail-conquering machine.
From suspension upgrades and engine tuning to comfort and adventure accessories, every modification enhances your experience on dirt, gravel, and beyond.
Whether you’re exploring desert canyons or mountain passes, a customized KLX250 is the ultimate combination of reliability, agility, and off-road freedom.
Kawasaki Ninja H2 Custom Performance Mods – Ultimate Guide to Tuning the Supercharged Beast
The Kawasaki Ninja H2 is the pinnacle of superbike engineering — a street-legal, supercharged monster with raw power and futuristic design. But even perfection can be improved.
Through custom Kawasaki Ninja H2 performance mods, riders in the USA can unlock even more horsepower, sharper handling, and breathtaking aesthetics. Whether your goal is top speed domination or show-stopping appeal, this guide will help you transform your Ninja H2 into a one-of-a-kind powerhouse.
Kawasaki designed the H2 to redefine what’s possible on two wheels. Its 998cc supercharged inline-four engine delivers unmatched acceleration — but customization lets you fine-tune this performance to your exact preferences.
Top reasons to modify your H2 include:
Performance Gains: Boost horsepower and throttle response.
Handling Improvements: Make a heavy hyperbike corner like a supersport.
Aesthetic Personalization: Create a futuristic, head-turning design.
Track & Street Optimization: Balance aggression with rideability.
For riders who crave more than factory perfection, the H2 is the ultimate tuning canvas.
⚙️ Performance Upgrades for Maximum Power
1. ECU Flash and Tuning
The stock ECU limits top-end power and throttle response.
Use Woolich Racing or ECU Flash Pro to remove speed limiters, adjust air/fuel ratios, and increase boost.
Gains: +15–25 HP.
2. Exhaust System
Replace the stock exhaust to reduce backpressure and weight.
Akrapovič, Graves Motorsports, and SC Project offer titanium or carbon systems.
Pair with a tune for maximum efficiency.
3. Supercharger Pulley Upgrade
For advanced tuners, upgrading the pulley ratio increases boost pressure — pushing the H2 past 250 HP. (Requires professional installation.)
4. Air Intake & Filter
Install a Sprint P08 filter or DNA high-flow air filter for improved airflow.
5. Intercooler Upgrade
For track and drag builds, a larger intercooler keeps intake temps stable under boost.
🧠 Power Management & Drivetrain Mods
1. Quickshifter & Auto-Blipper
Enhance shifting precision with an HM Quickshifter Plus or Translogic IS4. Perfect for seamless upshifts and downshifts under load.
2. Clutch Upgrade
Install a Suter or STM slipper clutch to prevent wheel hop during aggressive downshifts.
3. Chain & Sprocket Kit
Switch to a lightweight 520 chain conversion for quicker acceleration.
🏁 Handling & Suspension Upgrades
The Ninja H2’s immense power demands stability and precision handling.
1. Front Forks
Replace stock units with Öhlins FGRT 203 or K-Tech RDS forks for race-level feedback.
Add custom valving for road or track use.
2. Rear Shock
Install an Öhlins TTX GP or Nitron R3 rear shock.
Fully adjustable preload, rebound, and compression improve control under acceleration.
3. Steering Damper
A must-have for taming wheelies and high-speed wobbles.
Try the GPR V5 or Öhlins adjustable damper.
🛞 Brake System Enhancements
When pushing 230+ HP, stopping power is critical.
Brake Rotors: Brembo T-Drive floating discs for heat control.
Calipers: Brembo Stylema or GP4-RX units for race braking precision.
Brake Lines: Steel braided lines prevent fade.
Pads: Dual-sintered race pads for ultimate grip.
These upgrades drastically improve feel and fade resistance at high speeds.
💨 Aerodynamic & Body Upgrades
The Ninja H2’s aggressive styling is already aerodynamic, but custom mods enhance performance and looks.
1. Carbon Fiber Fairings
Replace OEM panels with Carbonin, Ilmberger, or Hotbodies Racing carbon fiber.
Reduces weight and adds a stealth aesthetic.
2. Winglets & Spoilers
Add aerodynamic winglets for high-speed stability (inspired by H2R).
Carbon fiber kits are available from FullSix Carbon.
3. Tail Conversion
Install a tail tidy and integrated LED taillight for a cleaner rear end.
4. Paint & Finish
Go with mirror black, matte stealth, or metallic green finishes.
Add heat-resistant ceramic coating to the exhaust for a professional look.
🧱 Weight Reduction Mods
Every pound counts on a superbike.
Wheels: Forged aluminum or carbon wheels from Rotobox or Marchesini can cut up to 10 lbs.
Battery: Lithium-ion battery from Shorai or Antigravity saves 5 lbs.
Bolt Kits: Titanium or aluminum fasteners reduce non-rotating mass.
These changes make the H2 feel sharper and more agile without compromising durability.
⚡ Electronics & Tech Upgrades
The H2 already includes advanced electronics, but you can refine them further:
Data Logger: AIM Solo 2 DL for lap analysis.
ECU Mapping App: Use Woolich Log Box for live tuning.
Custom Display: Motec C125 digital dash for race-style metrics.
Integrated Camera System: Add an Insta360 camera for documenting track sessions.
💰 Estimated Cost of a Custom Ninja H2 Build
Category
Estimated Cost (USD)
ECU & Power Mods
$1,500 – $3,000
Exhaust System
$2,000 – $5,000
Suspension & Brakes
$3,000 – $6,000
Aesthetics & Aerodynamics
$1,500 – $4,000
Electronics
$1,000 – $3,000
Weight Reduction
$800 – $2,000
Total Build Estimate
$9,000 – $23,000+
🇺🇸 Top U.S. Custom Builders for Kawasaki Ninja H2
Superbike Unlimited (North Carolina): ECU flashing and race tuning specialists.
Attack Performance (California): Race-grade carbon parts and suspension setup.
Brock’s Performance (Ohio): Custom H2 drag racing components and exhausts.
These shops are renowned for precision tuning and safe power delivery.
🧠 Pro Tips for Ninja H2 Customization
Tune Responsibly: Always re-map your ECU after changing intake or exhaust components.
Upgrade Brakes First: Safety before speed.
Track Test Gradually: Adjust one mod at a time for predictable results.
Monitor Boost Levels: Avoid excessive pressure to protect the supercharger.
🏁 Conclusion: Build the Ultimate Supercharged Masterpiece
The Kawasaki Ninja H2 is already an engineering marvel — but with the right custom performance mods, it becomes an otherworldly machine. From ECU flashes and carbon fiber panels to aerodynamic tweaks and suspension tuning, your H2 can be tailored for track domination or elite street presence.
A custom Ninja H2 isn’t just a motorcycle — it’s a statement of power, precision, and individuality.
Kawasaki Vulcan S Custom Cruiser Guide – How to Build the Perfect Custom Cruiser
The Kawasaki Vulcan S is one of the most versatile cruiser motorcycles ever produced. With its unique Ergo-Fit system, modern styling, and smooth 649cc parallel-twin engine, it’s a perfect platform for customization.
In this Kawasaki Vulcan S Custom Cruiser Guide, we’ll walk you through how to transform your Vulcan S into the ultimate personalized cruiser — whether your goal is a classic bobber, a sport-cruiser hybrid, or a long-distance touring machine.
Unlike traditional heavyweight cruisers, the Vulcan S is lightweight, responsive, and adaptable. Its compact frame and modular design make it ideal for custom modifications.
Here’s why it’s a favorite among custom builders:
Ergo-Fit System: Adjustable handlebars, seats, and footpeg positions.
Modern Powertrain: Fuel-injected 649cc engine derived from the Ninja 650.
Affordable Base Price: Leaves room in your budget for top-tier upgrades.
Beginner-Friendly Handling: Easy to ride, yet powerful enough for veterans.
⚙️ Performance Upgrades for the Kawasaki Vulcan S
Even though the Vulcan S is known for comfort and style, it’s also capable of impressive performance gains.
1. Exhaust System
Swap the stock muffler for a Vance & Hines, Cobra, or Two Brothers Racing exhaust.
Increases horsepower by 5–8%.
Adds a deep, classic cruiser rumble.
2. Air Intake
Upgrade to a K&N high-flow filter or Baron Big Air Kit for improved throttle response.
3. ECU Tune
Flashing your ECU through Power Commander or Fuel Moto optimizes fueling and ignition for your mods.
4. Chain & Gearing
Switch to a 520 chain conversion kit for lighter weight and smoother response.
🛠️ Styling & Body Modifications
Customizing the look of your Vulcan S lets you define your riding identity.
1. Bobber Conversion
Remove the rear fender and replace it with a short-cut bobber fender.
Add a solo leather saddle seat.
Black out the exhaust and side panels.
2. Café Racer Look
Install clip-on handlebars.
Add a café-style seat cowl.
Swap mirrors for bar-end types.
3. Classic Cruiser
Add chrome engine covers and fender trim.
Install whitewall tires.
Use a two-tone metallic paint scheme.
🧰 Comfort & Ergonomics Enhancements
For longer rides, comfort is key. Kawasaki’s Ergo-Fit system allows easy customization, but aftermarket parts can refine it further.
Seats: Try Mustang or Corbin seats for gel comfort and back support.
Handlebars: Replace with mini-ape or drag bars for your preferred posture.
Foot Controls: Forward control kits from Baron or Kuryakyn enhance comfort.
Windshield: Add a quick-release windshield from Memphis Shades or Puig for highway use.
🧱 Suspension & Handling
While the stock suspension is decent, custom cruisers often benefit from a smoother and more controlled ride.
Front Forks: Progressive Suspension drop-in cartridges for better damping.
Rear Shocks: Replace with adjustable Hagon or Öhlins shocks for comfort and handling.
Tires: Choose Michelin Commander III or Metzeler Cruisetec for grip and mileage.
💡 Lighting and Electronics
Modernize your Vulcan S with stylish, functional upgrades.
LED Headlight: Upgrade to a Daymaker-style or Halo LED unit.
Turn Signals: Sleek LED indicators improve aesthetics.
Tail Light: Integrated brake/turn LED bar for a clean rear look.
Phone Mount & USB Charger: Perfect for long-distance cruising.
🧰 Protection & Practical Upgrades
Cruisers benefit from practical accessories that preserve aesthetics while adding utility.
Crash Bars: Kuryakyn or Hepco & Becker engine guards for safety.
Luggage Racks: Add a solo rack or full touring luggage system.
Saddlebags: Leatherworks, Viking Bags, or Shad hard panniers for storage.
Floorboards: Replace footpegs for added comfort on long trips.
🎨 Paint and Custom Finishes
Nothing sets your Vulcan apart like a killer paint job.
Matte Black: Clean, aggressive, and timeless.
Candy Green or Blue: Pays homage to Kawasaki’s sport heritage.
Custom Airbrushing: Flame patterns, skulls, or classic pinstriping for show builds.
For durability, use ceramic or powder coating on metal parts like frames and exhaust covers.
💰 Estimated Cost of a Kawasaki Vulcan S Custom Build
Upgrade Category
Estimated Cost (USD)
Performance Mods
$800 – $2,500
Styling Mods
$1,000 – $3,000
Comfort & Ergonomics
$600 – $1,500
Lighting & Electronics
$400 – $1,200
Suspension
$800 – $2,000
Paint & Finish
$1,000 – $3,000
Total Investment
$4,000 – $12,000+
Custom builds vary depending on your vision and whether you perform the work yourself or hire a professional.
🏍️ Real-World Custom Vulcan S Builds in the USA
LA Custom Garage (California): Created a low-slung bobber with blacked-out engine covers and shorty pipes.
Freedom Cycles (Arizona): Designed a touring-focused Vulcan S with hard bags and wind protection.
East Coast Kustoms (Florida): Built a show-winning café racer using carbon accents and clip-ons.
🧠 Tips for a Successful Custom Cruiser Build
Plan the Aesthetic First: Visualize your style before ordering parts.
Upgrade Functionality First: Prioritize suspension and brakes before cosmetic work.
Stay Street Legal: Check lighting and exhaust compliance for your state.
Balance Weight: Avoid over-accessorizing — cruisers perform best when lean and balanced.
🏁 Conclusion: Create Your Own Kawasaki Vulcan S Custom Cruiser
The Kawasaki Vulcan S is one of the most customizable cruisers on the market, blending comfort, modern styling, and sport-inspired performance. With the right parts and vision, your Vulcan can evolve into a machine that perfectly matches your riding personality — whether it’s a sleek bobber, a muscle cruiser, or a long-distance tourer.
Custom Kawasaki Ninja ZX-10R Builds USA – Ultimate Guide to Street and Track Mods
The Kawasaki Ninja ZX-10R is an icon in the superbike world — a powerful machine born from racing DNA and engineered for precision. But for enthusiasts in the USA, a stock ZX-10R is just the beginning.
Through custom Kawasaki Ninja ZX-10R builds, you can create a bike that’s uniquely yours — tuned for ultimate speed, street presence, and control. Whether you’re chasing track records or turning heads on the highway, this guide reveals how to customize your ZX-10R into a masterpiece of power and performance.
🏍️ Why Custom Build a Kawasaki Ninja ZX-10R?
The ZX-10R already delivers astonishing performance with its 998cc inline-four engine and advanced electronics. But a custom build offers three key advantages:
Performance Precision: Tailor power delivery, suspension, and aerodynamics for your riding style.
Unique Aesthetics: Create a one-of-a-kind look with carbon fiber bodywork, lighting, and paint.
Enhanced Control: Upgrade braking, tires, and ergonomics for better handling on both road and track.
If you want to stand out in the USA superbike scene, a custom ZX-10R build is the way to do it.
🏁 Conclusion: Build the Ultimate Custom Kawasaki Ninja ZX-10R
Creating a Custom Kawasaki Ninja ZX-10R Build in the USA is more than just modification — it’s self-expression through engineering. From suspension tuning and performance mods to carbon bodywork and custom paint, every upgrade transforms the ZX-10R into a unique reflection of its rider.
When you combine Japanese precision with American craftsmanship, the result is a machine that dominates both street and circuit.
How to Modify a Kawasaki Versys 650 – Best Adventure Upgrades for Performance & Comfort
The Kawasaki Versys 650 has earned its place as one of the most versatile adventure-tourers on the market. Known for its reliability, nimble handling, and upright ergonomics, it’s a perfect base for adventure customization.
If you’re wondering how to modify a Kawasaki Versys 650, this guide covers everything—from performance and comfort upgrades to off-road accessories and adventure-ready gear—to help you transform your Versys into the ultimate dual-purpose machine.
Why Modify Your Kawasaki Versys 650 for Adventure?
The stock Versys 650 is already a capable all-rounder, but with a few well-chosen modifications, it becomes a serious adventure-touring beast. Customizing your Versys helps you:
Handle Tough Terrain: Improve suspension and tires for dirt and gravel.
Boost Comfort: Upgrade seats, wind protection, and controls.
Increase Utility: Add luggage racks, crash bars, and navigation systems.
Enhance Performance: Unlock more torque and throttle response for long trips.
Adventure riders love the Versys for its lightweight frame, smooth parallel-twin engine, and superior balance—a combination perfect for customization.
Learning how to modify a Kawasaki Versys 650 opens the door to true adventure freedom. Whether you’re aiming for off-road exploration, weekend touring, or long-distance journeys, the Versys 650 adapts beautifully with the right upgrades.
From comfort and luggage enhancements to suspension and protection systems, each modification moves your bike closer to the ultimate dual-sport machine.